Last updated: 21/02/2012
by docop, docop12@yahoo.com
This is just a really basic tutorial that steps through the process of how I make simple collages. If you're a total beginner who doesn't own any photo editing software, this short guide should (hopefully!) get you started and producing some relatively decent collages.
We'll be using GIMP (The GNU Image Manipulation Program), which is an entirely free program. You can download it (for PC, Mac, Linux, etc) here. I'll be using version 2.6.11, the latest version as I'm writing this, but I'm sure this tutorial will also cover future versions.
Before we start I just want to make it clear - I'm no professional artist, this is just a fun little self-taught hobby for me. Many of the techniques I use will probably make more experienced collagers groan or laugh. This guide is just to show how I currently make my collages, I'm not claiming to be giving a professional photomanipulation course. So don't take my way of doing things to be the way to do things. You'll get the most out of this tutorial if you also search for other tutorials/guides by other artists, and experiment with different techniques yourself. Practise and experience makes perfect!
Finally, I thought I might offer some encouragement. I made following three collages were made entirely in GIMP using the techniques I'm going to describe here. With good practise and sufficient care in your work, you'll be making nice collages in no time!
 |
| Full version |
 |
| Full version |
 |
| Full version |
Step 1. Setting up GIMP.
Just a quick step here, we'll want to make sure we've got the toolbars open that we'll be using.
Once you've got GIMP up and running, go to the 'Windows' menu and hover your cursor over 'Dockable Dialogs'. This lists the various toolbars you can have open while working in GIMP. Make sure the 'Navigation', 'Layers', and 'Undo History' toolbars are open. You can close any of the other toolbars you want (except for 'Toolbox', closing that will exit GIMP) to free yourself of clutter, and you can rearrange them all anyway you like.
Your GIMP layout should look something like this:
 |
| General GIMP layout. |
A quick description of all the toolbars visible in the above image:
Toolbox - This contains the various tools we'll be using to manipulate the images.
Navigation - This helps you quickly navigate around your collage and zoom in and out.
Layers - A collage is usually made up of a number of elements which are stacked on top of each other, called 'layers'. If you've never encountered layers before, it'll make a lot more sense when we get to that part of the tutorial.
Undo - Like most programs, GIMP has an undo function so you can redo steps if you mess up, or if you're just unhappy with the results and want to try again.
Step 2. Selecting collage material.
Believe it or not, this is the most important step when it comes to collaging. The better matched the different elements of a collage are - lighting, colour, perspective, focus, level of detail, interaction, etc - the more realistic your collage will look and the less work you'll have to do to blend it all together! So the best advice I can give you here is to put a decent amount of effort into finding a good background to match the image of your model (or conversely, a good image of a model to match your chosen background).
For the purposes of this tutorial, I'll provide the images we'll use. Open the following two images (click on them to open them at full size) and save them to your computer.
 |
| Background |
 |
| Emma Watson |
Step 3: Opening images and placement.
Let's get started!
First, open both of the images in GIMP. Pretty standard stuff, just go to the 'file' menu, select 'open' and open the two images from where ever you saved them on your computer.
 |
| Open the images. |
 |
| Paste the Emma Watson selection into the Background image. |
 |
| Make the Pasted Selection into a New Layer. |
You can now close the full Emma Watson image if you want, we'll be working solely with the layer pasted onto the Background image.
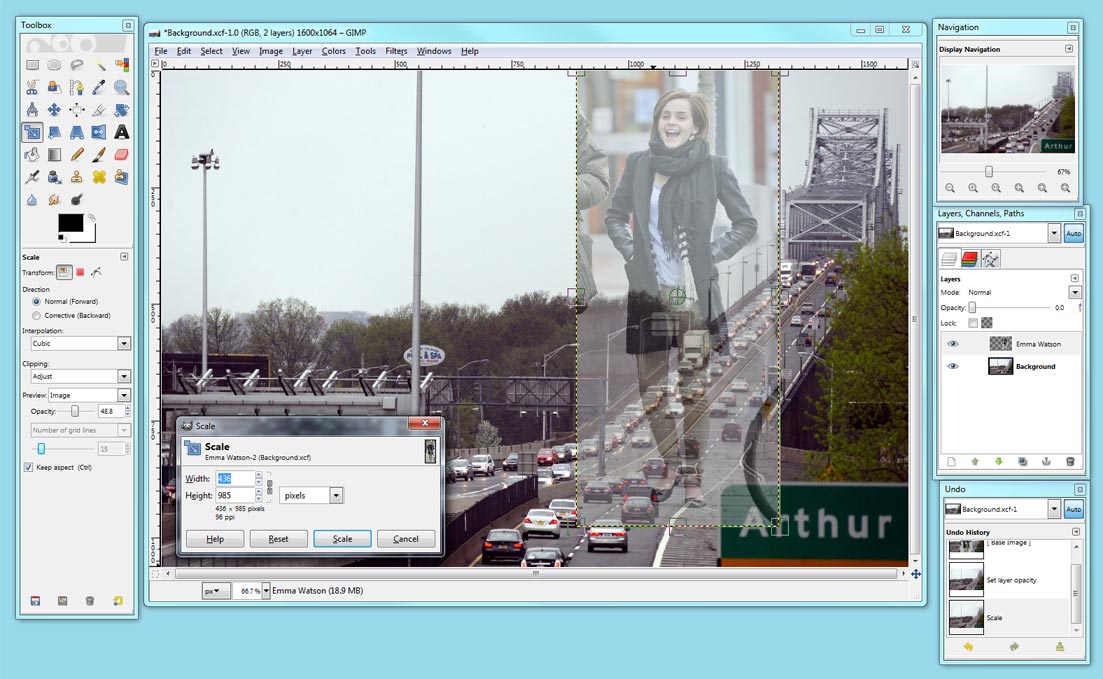
We'll now want to rescale/reposition/reorient the Emma Watson layer. Making sure the Emma Watson layer is selected (it should be highlighted in the 'Layers' toolbar), select the 'Scale Tool' from the 'Toolbox' toolbar. Click somewhere on the image to bring up the 'Scale' toolbar.
 |
| Use the 'Scale Tool' to bring up the 'Scale' toolbar. |
Before we actually resize/move the layer, I'll point out a weird little thing about GIMP. When resizing/moving a layer around, you'll usually want to reduce it's opacity (ie. make it partially transparent) so you can better judge its placement. However, GIMP seems to treat the opacity of the layer itself and the opacity of the layer as it's being resized as separate things.
To see what I mean, click on one of the resize handlebars (the square boxes) that have appeared along the edges of the Emma Watson layer and drag it inwards (which, as you'll see, resizes the layer). You'll notice that there are now two images of Emma Watson on the screen - the original larger one, and the smaller one you have just resized. This is annoying, you've got too much unwanted stuff cluttering the screen. The first thing we'll do about this is make the larger original image invisible. Go to the 'layer' toolbar and drag the 'Opacity' slider down to 0%. This will make the original larger image of Emma Watson invisible.
 |
| Reduce opacity in the 'Layers' toolbar to zero - circled in red. |
 |
| Reduce opacity in the 'Toolbox' toolbar to about 50% - circled in red. |
 |
| A good place to position the Emma Watson layer in this image. |
Note that GIMP also has a 'Rotate Tool' in the 'Toolbox' toolbar, which works in a similar way to the resize tool.
You might have also noticed that the Emma Watson layer has an annoying yellow and black checkered line going around it. You can turn this off by going to the 'View' menu and unchecking 'Show Layer Boundary'.
Before we move onto the next step, I'll quickly talk about saving your work. As with anything you do on a computer, saving your progress is very important! I'll usually save after I finish each step, so if I mess the next step up I can restart without hassle. Go to the 'File' menu and select 'Save'. The 'Save' options will have now popped up - click the little cross icon next to 'Select File Type (By Extension)'. You're going to want to select the 'GIMP xcf image' file type. Name the file whatever you want (I just left it as 'Background') and save it where ever you want. Opening that file will open your image with all the layers exactly as you left it when you last saved (which is exactly what you'd expect it to do!).
 |
| Saving the GIMP document. |
4. Cropping.
This is where things get a bit tedious.
There are a few different ways to crop around a model in an image - some are quick and do a poorer job, some take longer but do a better job. I tend to favour the latter option. Apart from a few more advanced techniques which I won't discuss here (involving blending layers, I might add a section at the end discussing these), I do all of my cropping the same way - by manually tracing around the edges of the model using the 'Free Select Tool', followed by some edge clean up with the 'Eraser Tool' if required.
It might sound a bit painful (and it definitely can be!), but it's also a fairly straight forward and mindless task. Put some music on or have a movie/tv show on in the background, and it'll pass quickly enough.
First, I like to zoom into the image to about 800% (use the zoom buttons in the 'Navigation' toolbar). We'll start at Emma's feet. Select the 'Free Select Tool' from the 'Toolbox' toolbar (top row, third tool from the left) and we'll start tracing around her shoes.
The 'Free Select Tool' works as follows. First, you click once where you want the selection to begin, then move your cursor to a new position and click again. This will join the two points with a straight line. Move the cursor to a new position and click again, and a straight line will again join the new point with the last. To close the selection, double click the mouse on the final point - this will connect the final point with the very first point. Try it out (because explaining it in text seems weird and difficult to me!).
The trick is to trace slightly "inside the lines". If you look at the border between the model its background, there isn't a clear cut-off between, say, shoe and concrete (see the image below). There are usually a few pixels of a blurred intermediate colour (in the case below, a few pixels of darkish grey between the black of Emma's shoe and the light grey of the concrete).
 |
| The blurry middle colour between the edges of the model and its background. |
So start tracing! I'll try my best to demonstrate how I trace in the images below. It's pretty simple when you get into the swing of it, so there shouldn't be much trouble. I like to do it in segments, I'll trace a portion of the image (eg. around the shoes) then close up the selection and delete the unwanted bits of background - using the 'delete' key on your keyboard, or 'Clear' from the 'Edit' menu - before continuing with the tracing. I do it like this in case I mess something up - if I mess one small bit up, it's quick enough to just redo the last step. If I mess something up while doing the entire selection at once, it can be a lot more messy and time consuming. This whole process will be shown below.
 |
| Tracing around the shoes using the 'Free Select Tool' and staying slightly "within the lines". |
 |
| Doing it in segments - close up the selection at regular intervals. |
 |
| Double click to close up the selection. |
 |
| Use the 'delete' key on your keyboard or 'Clear' from the 'Edit' menu to delete the selected parts of the layer. You can see the background image poking through, which is exactly what we want. |
 |
| Arm gap. |
 |
| Around the foot. |
 |
| Around the arm. |
 |
| Between the legs. |
 |
| Between the legs near the shoes. |
 |
| Over the shoulder. |
 |
| Up the arm. |
 |
| First bit of hair. |
 |
| Rest of the hair. |
Hopefully I haven't spammed you with too many images! And hopefully you get the idea of how I crop and what I mean by cropping "inside the lines".
You should now have something that - hopefully - looks like this:
 |
| Fully cropped Emma Watson. |
For more complicated hair styles, I would have taken a bit more time to crop around the hair and also made use (sparingly!) of the smudge tool and brushes to paint some more hair strands in. I might cover a few different techniques I use for hair in a different tutorial or section of this tutorial at a later date.
There is one final step here before we move on. We want to blur the edges of the Emma Watson crop ever so slightly to produce that middle-colour effect I pointed out earlier, which will help blend her into the background. It's really simple.
Select the 'Fuzzy Select Tool' from the 'Toolbox' toolbar (top row, second tool from the right). Click in the space next to Emma (not directly on her!) to select the empty region of the layer around her. Hold down the 'Shift' key on your keyboard and also click in the gap between her arms and legs; this will add those gaps to the selection.
The selection should look like this:
| Selecting the empty space around the Emma Watson layer. |
Now go to the 'Select' menu and click 'Border...'. This brings up the border selection window. As the name suggests, this expands the selection by creating a border around it. You can play around with the width, but generally 3-4 pixels seems to work well for me. The selection should now look like this:
 |
| Adding a border to the selection; we've now just selected the edges of the cropped image. |
Now go to the 'Filters' menu, hover your mouse over 'Blur' and select 'Gaussian Blur...'.
 |
| The Gaussian Blur window. A blur radius of about 0.8 seems to work well for this image. |
We don't want to blur the selection too much (it's a subtle effect!), it should just be enough to help blend the cropped image into the background a bit. Something around 0.8 pixels seems to work well with this image. The value can depend on a lot of factors though - the resolution of the images you're working with, how blurry your source material is, etc. When working on other collages, just play with the values until you find something that blends it well without making it overly blurry.
And that's the cropping done! So your collage should currently look something like this:
 |
| Emma Watson - fully cropped. |
5. Colour, Brightness, Contrast, and Saturation Matching.
Coming soon.
6. Foreground elements.
Coming soon.
7. Shadows and lighting.
Coming soon.
8. Final touches.
Coming soon.
Email any comments/suggestions to docop12@yahoo.com
Thanks a lot man.excellent tutorial,it helped me a lot.the best GTS collage tutorial of the internet.
ReplyDeleteHey, will you tell us how you sometimes make them naked?
ReplyDelete